Road Trips Reenacted
Multi-Video Synchronization with FFmpeg
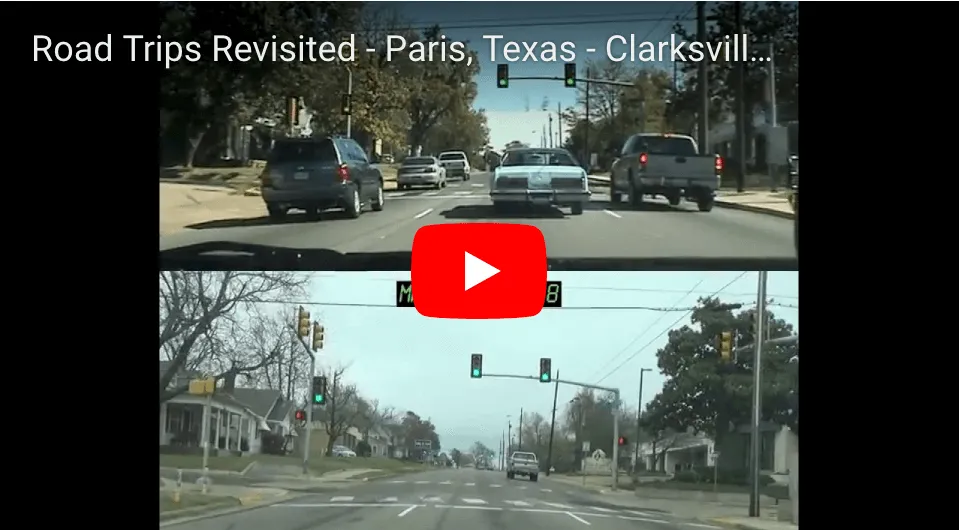
Over the last winter break I spent time archiving a collection of old camcorder tapes to hard drive. Most of the recordings were just randomly-captured silly moments of yesteryear, but one particular set of videos caught my attention: a few scenic joyrides across the streets and neighborhoods of my hometown (Paris, Texas 🤠) in 2003.
Wondering exactly how much of the town had changed over the course of approximately 15 years, it occurred to me that I could answer that question by re-recording the same camcorder journeys on my next Texas visit and comparing the videos afterwards. Ultimately I wanted to create a split-screen video from this experiment, so synchronization was important.
So I decided to embark on this new side project which ended up rewarding me with a much better understanding of FFmpeg, a wonderfully versatile video editing tool. This blog post basically documents that experiment.
I should briefly mention that while I work at Netflix, my official role there is as a UI engineer so I don’t consider myself a video expert, even though it’s a central component of our business. If anything, I’m just doing things like this to learn more! 😀
basic approach ( “slice, scale, and splice” )
The basic sync strategy I pursued was to initially split up each video into separate clip segments, demarcated by the timestamps of common geographic locations shared between the two clips ( i.e. all encountered street intersections. ) Afterwards, each 2003 segment was compared with its 2018 counterpart and ( generally speaking ) the shorter/fastest segment video was “slowed down” until its duration matched the longer/slower segment.
Once this process was complete, it was then just a matter of splicing the longest segments together to generate a final video.
Note: Originally I was able to accomplish this using Apple’s iMovie ( thanks to its nifty Speed slider feature ) however over time I found it a bit tedious and error-prone ( the application supports only one primary video track and modifying the segment durations by hand didn’t alway feel precise )
preparing the videos
Since I want my final split-screen video to be rendered in 1080p, I chose to scale each clip to fit within a 960x540 window. This size was intentionally chosen to preserve the original 16:9 aspect ratio of the two videos.
ffmpeg -i ./clip2003.avi -vcodec huffyuv -vf scale=960:540 -r 60 -vsync cfr -an clip2003_60fps_960x540.avi
ffmpeg -i ./clip2018.avi -vcodec huffyuv -vf scale=960:540 -r 60 -vsync cfr -an clip2018_60fps_960x540.avi- -i inputfile — Specifies the input file
- -vcodec codec — Chooses a video codec for the output video
- -vf scale= width:height — Changes the video resolution
- -r framerate — Sets new frame rate
- -vsync cfr — Forces output to be at a constant frame rate
- -an — Removes audio stream
With the -vcodec huffyuv argument, I’m basically requesting that this operation output to a lossless AVI container. I’ll be retaining this parameter going forward with each subsequent ffmpeg call since I don’t want to compromise the original video quality. By the way, I could have configured this to output to a MP4 instead, since the H.264 codec also supports a lossless mode. I decided to stick with the AVI format though since my earlier tests on a Win64 machine ran much faster. There is one tradeoff to be aware of, the HuffYUV codec generates ridiculously large files. I wasn’t too bothered by this, since disk space is “cheap” as they say.
I added the -r 60 -vsync cfr args to achieve a common constant frame rate between the two videos ( 60fps was the higher FPS of the two original videos. ) This is important since it ensures better accuracy and consistency on alignment later as the individual segments are synchronized ( The AVI format by default uses a variable rate, which isn’t deterministic enough for our calculations.)
I’m also using the -an parameter to strip out the audio since it’s not really useful to me. Slowing down the video segments would inconveniently affect the sound anyway and, besides, I can still add my own custom soundtrack later.
creating the sync points
Next I’ll define the official sync points of the two videos, i.e. those timestamps which represent common geographic positions shared between the two separate video timelines. These sync points are used to divide up the clip into multiple segments. Generating these by hand was cumbersome, so I decided to quickly hack together a JavaScript-based GUI ( affectionally named Syncerator ) to manage this for me. By writing a custom app I was able to quickly use keyboard shortcuts to add, edit and delete the points. I also eventually extended it to include a live preview mode ( taking advantage of HTML5 Video’s adjustable playbackRate property. )

Note: You might notice above that the two embedded video frames don’t exactly match up. This is because my camcorders have different field of view specs ( The newer lens has a wider viewing angle and closer objects appear more stretched ) This didn’t bother me that much during actual playback so I just accepted it.
step 1: “slicing” ( splitting the clips into segments )
Once I have a list of curated timestamps, I can then iterate through them and extract the in-between segments:
// Example of first segment from each clip being extracted:
ffmpeg -ss 0 -t 2 -i clip2003_60fps_960x540.avi -vcodec huffyuv -r 240 -vsync cfr segment_2003_1.avi
ffmpeg -ss 0 -t 3 -i clip2018_60fps_960x540.avi -vcodec huffyuv -r 240 -vsync cfr segment_2018_1.avi- -ss seconds — Seek to the starting timestamp position
- -t seconds — Limit duration to this amount
In case you may be wondering why the -i argument is not listed first, this is just an optimization to prevent FFmpeg from unnecessarily decoding the entire input video before seeking to the requested timestamp. It’s basically informing FFmpeg to apply the extraction directly on the input clip instead of the decoded output.
Note: The -ss, -t arguments also support the hh:mm:ss format. I just chose to use seconds in my case because it was simpler to directly export those units from the editor.
During the extraction you’ll notice that I’m also artificially increasing the frame rate to a higher multiple (240fps.) This is basically just a workaround to minimize precision loss later when the segments are scaled to a calculated duration that might not perfectly align with the base frame rate. This may seem like a trivial concern at first blush but as the multiple segments are concatenated it could have a cumulative effect causing the resulting videos to progressively fall more out of sync.
step 2: “scaling” ( extending the shorter segments )
Now that all of the clip segments have been extracted, the next step is to evaluate them ( comparing the 2003 versions against 2018)
For each pair, I identify the shorter segment and calculate the necessary scale factor which would be multiplied on the other segment in order to match the same duration.
scaleFactor = durationOfLongerSegment / durationOfShorterSegment
In the above example, since the 2003 sample segment ( 2 sec ) is shorter than the 2018 sample segment ( 3 sec ), a scale factor for the 2003 version will be determined:
scaleFactor = 3 seconds / 2 seconds = 1.5
To actually change the duration on the video itself, I’m basically going to be overriding the segment’s PTS (Presentation Time Stamp.) The presentation timestamp represents the exact time in which a video frame should be rendered and also is generally used to synchronize other stream types such as audio and subtitles.
FFmpeg exposes a setpts filter for customizing this. In this context, it helps to think of the current PTS as a variable. So in order to change the resulting duration, I just need to multiply the scale factor as follows:
ffmpeg -i segment_2003_1.avi -vf "setpts=(1.5)*PTS" -vcodec huffyuv -vsync cfr segment_2003_1_scaled.avi
- -vf filter — Set a custom video filter

Note: I’m favoring the longer segment duration in the comparisons above to keep this guide simple. It’s a safe default to use if you want to maximize scenic footage but it’s not always ideal. For example, it doesn’t make much sense to slow a video segment to a crawl just because in the other segment a car is stuck waiting patiently 😑 at a red light. For that reason, I actually chose to override this behavior in a few cases.
step 3: “splicing” ( reconnecting the segments )
At this point I’ve compared all of the segments so finally I’m going to use them to recreate the full videos - but include the newer (i.e. longer) versions this time. To simplify this, I’m creating an ordered list of clips for each year:
// segments2003.txt
file 'segment_2003_1_scaled.avi'
file 'segment_2003_2.avi'
file 'segment_2003_3_scaled.avi'
file 'segment_2003_4_scaled.avi'
file 'segment_2003_5.avi'
...

// segments2018.txt
file 'segment_2018_1.avi'
file 'segment_2018_2_scaled.avi'
file 'segment_2018_3.avi'
file 'segment_2018_4.avi'
file 'segment_2018_5_scaled.avi'
...
Now they can be joined together:
ffmpeg -f concat -i segments2003.txt -vcodec huffyuv -vsync cfr -r 60 final2003.avi
ffmpeg -f concat -i segments2018.txt -vcodec huffyuv -vsync cfr -r 60 final2018.avi
- -f concat - Specifies input format as a list of files to join
Once the segments are concatenated, I’m adding the -r 60 argument to restore the original framerate ( since the earlier 240fps was only needed to help align the extracted and scaled segments )
wrapping up
creating the split-screen
This final stage is mostly focused on presentation. To achieve a split-screen effect, I basically need to vertically stack the final videos together. Once again, FFmpeg makes things easy for us:
ffmpeg -i final2003.avi -i final2018.avi -vcodec huffyuv -filter_complex vstack final_splitscreen.avi
- -filter_complex filterType —Select complex video filter
( The vstack filter type above is informing FFmpeg to apply a “vertical stack” layout on the two input videos. )
Having a split-screen video is cool and all, but doesn’t it doesn’t provide much context to someone viewing it for the first time. So I thought I’d have a little fun and add Back To The Future-esque LCD clock labels to each pane ( Special Thanks to Samuel Reynolds for creating the retro-LCD font that was used. )
The following command adds centered labels at the top of each pane of the 960x1080p video:
ffmpeg -i final_splitscreen.avi
-vf "[in]drawtext=fontfile=./fonts/LCDMN___.ttf: text='MARCH 18, 2018': fontcolor=7DE06F: fontsize=34:
box=1: boxcolor=black@1.0: boxborderw=5:
x=(w-text_w)/2: y=540+20,
drawtext=fontfile=./fonts/LCDMN___.ttf: text='OCTOBER 27, 2003': fontcolor=FF9A3D: fontsize=34:
box=1: boxcolor=black@1.0: boxborderw=5:
x=(w-text_w)/2: y=20"
-vcodec huffyuv final_splitscreen_labeled.avi

publishing
I’m almost done at this point. I just need to do something about the really large video file which remains ( due to my earlier decision of sticking with the lossless AVI format 😀 )
That’s not a problem since in this final step I’m going to transcode it to a much smaller Internet-friendly MP4 video format by using the H.264 codec. Also, since I’m ultimately uploading this video to YouTube anyway, I’ll include all of Google’s recommending settings ( Credit to Jernej Virag for nicely documenting the extra params here):
ffmpeg -i final_splitscreen_labeled.avi -codec:v libx264
-crf 21 -bf 2 -flags +cgop -pix_fmt yuv420p -codec:a aac
-strict -2 -b:a 384k -r:a 48000 -movflags faststart final_splitscreen_labeled.mp4
Now is a good time to mention that the above command will actually produce a lossy video, although the Constant Rate Factor ( H.264’s default quality setting ) can be directly configured by changing the -crf value. While the above CRF value of 21 introduces some quality loss, it’s a nice compromise since it’s perceptibly lossless in most cases while having the benefit of better compression.
Note: The supported range of CRF is 0 to 51 ( with 0 being lossless and 51 representing worst quality / best compression ) If the -crf argument isn’t included in the command, FFmpeg will assume a default value of 23.
conclusion
Thanks for reading! If you feel inspired to go out and create your own multi-synced video, I’d love to hear about it ( please feel free to share it with a search-friendly #roadtripsync tag. ) To save you time with the synchronization itself, here is a Python script that automates the “slice, scale, and splice” steps.